

Key Configurator
The KeyConfigurator utility
To configure the key of the USB Button, the first step is to connect it to a PC. For a standard (wired) USB Button, you connect the button itself to the PC. For a Wireless Button, you connect the interface (the Dongle) to the PC.
If the “Key Configurator” utility is not yet installed, the second step is to download & install it. If it is already installed, you can simply launch it.
Installing & launching the “Key Configurator”
Download the right version for your operating system.
| Microsoft Windows | | Version 2.13 (2024-09-10) |  | 1.3 MiB |
| Apple macOS | | Version 2.13 (2024-09-16) | | 3.7 MiB |
| Linux | | Version 2.13 (2024-09-12) | | 2.7 MiB |
 Notes for Apple macOS
After downloading and opening the Disk Image File, macOS may complain that the
downloaded file is corrupted and cannot run. This is a misrepresentation: in
fact, Gatekeeper keeps the file from running, because it is set to not trust
files from third-party sources. See Safely open apps on your Mac
for how to circumvent this issue (especially the section “Install an app from an unidentified developer”
near the bottom of the page). For recent versions of macOS, also see
How to Disable Gatekeeper and Allow Apps From Anywhere in macOS
for temporarily bringing back the option to run programs from unidentified
developers (sudo spctl --master-disable).
 Notes for Linux
On Linux, the package installs the required “udev” rules.
This assumes that your Linux setup has udev installed and running;
if not, you must run the Key Configurator utility as root.
Wired USB buttons
If multiple buttons are connected at the same time, the button to configure can be selected from the drop-down list for the “Model”. The drop-down list shows the model name and the last three digits of the serial number of each connected button. Note that the last three digits of the serial number are also printed on the USB Button itself (above the USB connector).
Wireless buttons
When the Dongle is connected, the Key Configuration utility enables the selection buttons for all Wireless Buttons that the Dongle has detected. To have the Dongle detect a Button, press the Button once. This action will cause the Key Configuration utility to re-scan for Wireless Buttons in range.
If a Wireless Button has not been connected to a Dongle yet, the Key Configuration utility will show the Pin-Code dialog. The pin-code for a Wireless Button is printed on the bottom side.
Main options
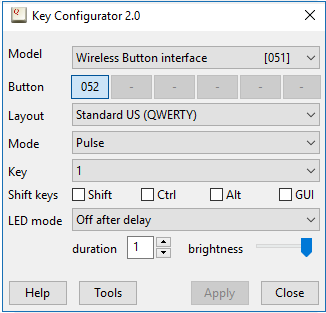
On start-up (or after connecting a USB Button or Dongle), the Key Configuration utility will show the model of the USB Button and its current configuration.
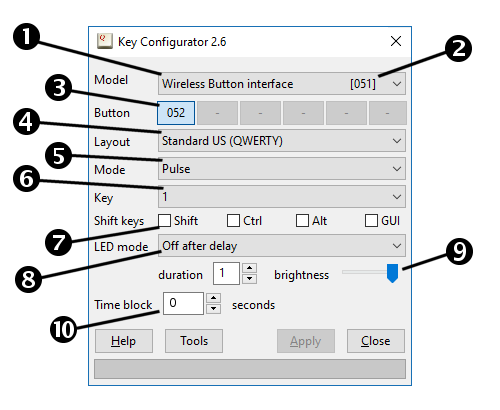
- ❶ Model
- The type of the button or dongle that is currently connected. This is a drop-down list; if you have multiple USB buttons connected, you can select which one to configure by selecting it from the drop-down list.
- ❷ Serial number
- The last three digits of the serial number of the button are shown at the right of the model. In case a Wireless Dongle is connected, this number is the serial number of the dongle. This serial number makes it easier to identify which button you are configuring.
- ❸ Button
-
This row is only present for the Wireless Dongle. The Dongle supports up to
six wireless buttons. You can select the one to configure by clicking on its
respective button.
The number in the button shows the last three digits of the serial number of the Wireless Button that is configured for this slot. For a slot that is not yet configured, the button shows a “-” - ❹ Layout
- The “keyboard layout” for the button should match the keyboard layout that is defined on the PC or workstation that the button is connected to. See the section Keyboard Layouts for more information.
- ❺ Mode
-
The switch mode is one of the following (the Key Configurator utility lists
only the modes that are applicable to the type of device that is attached):
Auto-repeat On a button press, a “key down” event is sent to the workstation, and on a button release, a “key up” event is sent. When the button is kept pressed, the “key down” event starts to repeat (just like a keyboard key repeats when it is held down).
This mode is not available on the battery-free button.Pulse A button press causes a “key down” event to be sent to the workstation, and a “key up” event is immediately sent after it (even if the button is held down). The “key down” thus does not auto-repeat. Reliable Only for wireless buttons with a battery: this is “pulse” mode, but where the button repeats the transmission of a button press if it does not receive a reply from the dongle. Macro A sequence of key codes is transmitted to the workstation. See the section “Macro syntax” for details. Toggle key Only for wired buttons: in “toggle key”, two key codes are defined for the button. At every button press, these key codes are sent alternatingly: on the first button press “key #1” is sent, on the second press “key #2” is sent, on the third press “key #1” is sent again, and so forth. A “toggle key” does not auto-repeat if the button is kept pressed. Tap or Hold Only for wired buttons: two key codes are defined for the button. If the button is briefly pressed and then released (“Tap”), the first key code is sent. If the button is pressed and held, the second key code is sent. The criterion is 0.75 seconds: if the button is released within 0.75 second, it is a “tap”. If the button is held for more than 0.75 second, it is a “hold”. - ❻ Key (“Auto-repeat”, “Pulse”, “Toggle-key” and “Tap or Hold” modes)
-
From the drop-down list, you can select a key, which may be a letter, a digit,
or a special key.
Note that the USB Button transmits key codes as standardized for US qwerty keyboards by the USB standard. The USB Button does not know about key remappings for different languages as performed by the operating system.
At the tail of the list, there are additional “input” commands or functions, that are not necessarily keyboard-related. For example, mouse button clicks can also be emulated.
In “Toggle-key” and “Tap or Hold” modes, there are two “Key” fields, called “Key #1” and “Key #2”. - ❻ String (Macro mode)
-
In this edit field, you can enter the sequence of characters to transmit on
a button press. The sequence does not auto-repeat if the button is held
down. See the section “Macro syntax” for
details.
Note that mouse button clicks (or other non-keyboard inputs) cannot be specified in a macro. - ❼ Shift, Control, Alt, GUI (“Auto-repeat”, “Pulse”, “Toggle-key” and “Tap or Hold” modes)
-
By putting a checkmark in any of these options, you specify that the transmitted
key is sent with these key shift options. For example, when F4
is selected as the key and the Alt option is checked, the USB Button
transmits Alt + F4 on a press.
The GUI key is also known as the “Windows” key. For example, GUI + R opens the Run dialog box.
These “shift modifier” keys are ignored for the non-keyboard functions. For example, when configuring the button to a mouse click or to a “play/pause” toggle, the Shift/Control/Alt/GUI modifiers are ignored. - ❽ Illumination (for applicable models)
- The illumination can be controlled by user software, but you can also define default actions. See the Illumination configuration section.
- ❾ Illumination brightness (for applicable models)
- For buttons that support variable brightness, the brightness can be adjusted with this scroll bar. See the Illumination configuration section for more information.
- ❽ Buzzer (option for pendant buttons)
-
For pendant buttons that support a buzzer, this option allows you to enable or
disable it, and to select a short versus a long beep.
This option replaces the illumination choice in the user interface. - ❿ Time Block
-
The buttons with recent firmware support a “time block” option, where the button
does not respond to button presses for a number of seconds after a press. For
example, when the time block is set to 3 seconds and the button is pressed, it
does not respond for more presses for three seconds after the first press.
The maximum value that can be set is 240 seconds (4 minutes).
Note that the button release is still transmitted (as a “key up” event) and that the key may auto-repeat if the button is held down. To avoid auto-repeat set the Mode to Pulse.
You must click on the “Apply” button to write the new key (and the modifier flags) to the USB Dome Button. After clicking Apply, you can close the utility and/or unplug the USB Dome Button.
The “Tools” button allows you to perform special functions, for the devices that support them. The button is not present if a device does not have special functions. For the Wireless Dongle, the “Tools” button gives you access to functions to reassign a Wireless Button to a different Dongle and to the clear the Dongle
Macro syntax
A macro is a sequence of key codes that are transmitted to the host device (as if someone typed in that sequence very quickly). A macro can hold up to 60 key codes on a single-button device (or 20 key codes per button on the 6-button interface). Each key code may have a shift modifier prefixed.
The characters that you type in the “string” field relate to the keyboard layout of the US qwerty keyboard (as standardized in the USB HID standard). Characters are sent without shift modifiers by default. To indicate that a shift key should be pressed together with the key code to send, the key must be prefixed with one of the following:
| + | Shift |
| ^ | Ctrl |
| % | Alt |
| # | GUI (“Windows” key) |
For example, to transmit Ctrl S, type “^S”. For the Shift key, most keys are automatically handled. For example, when you type “!”, it will implicitly be converted to “+1”, because on US qwerty keyboards the “!” is on the “Shift 1” key combination. However, to send any of the keys reserved for the shift modifiers, you need to translate these explicitly: so “+=” to transmit the “+” key and “+5” to transmit the “%” key.
In addition, a list of special key names is supported:
| {TAB} | Tab |
| {ENTER} | Enter |
| {ESC} | Escape |
| {BKSP} | Backspace |
| {SPACE} | Space bar |
| {F1} | F1 |
| {F2} | F2 |
| {F3} | F3 |
| {F4} | F4 |
| {F5} | F5 |
| {F6} | F6 |
| {F7} | F7 |
| {F8} | F8 |
| {F9} | F9 |
| {F10} | F10 |
| {F11} | F11 |
| {F12} | F12 |
| {HOME} | Home |
| {END} | End |
| {PGUP} | Page Up |
| {PGDN} | Page Down |
| {LEFT} | Arrow Left |
| {RIGHT} | Arrow Right |
| {UP} | Arrow Up |
| {DOWN} | Arrow Down |
| {PRTSC} | Print Screen |
| {CAPSLOCK} | Caps Lock |
| {SCROLLLOCK} | Scroll Lock |
| {NUMLOCK} | Num Lock |
| {PAUSE} | Pause |
| {INS} | Insert |
| {DEL} | Delete |
| {WAIT} | All keys up, delay 0.2 second |
Keyboard Layouts
A USB keyboard transmits universal “key codes” to the workstation that it is connected to. To translate these key codes to characters, the operating system uses the keyboard layout as a map. For example, USB key code 20 is a “Q” on a qwerty keyboard, but an “A” on an azerty keyboard.
The USB keyboard also transmits its layout to the operating system, but Microsoft Windows ignores that field. Instead, Microsoft Windows allows users to select the keyboard layout to use, irrespective of the layout of the physical keyboard.
For the USB button, the result is that the button should be configured for the same keyboard layout as that the target workstation uses. Otherwise, you might get the same effect as when you are using a qwerty keyboard on a workstation that is configured as using azerty.
Illumination Configuration
Several button models have internal illumination of the button actuator (the dome). The illumination can be controlled via application software, but the button can also switch the illumination on and off based on the mode and the parameters that you can configure.
The illumination mode defines the action taken after a button press. It can be one of the following.
- Default Off
- The button does not turn the illumination on or off. This is the appropriate mode when the illumination indicator is controlled by other software (e.g. the “Button Lights” utility).
- Default On
- The illumination is continuously on.
- On while button pressed
- The button is illuminated while it is kept pressed down, and goes off as soon as the button is released.
- On-Off toggle
- The illumination toggles between on and off at each press. At the first press, the illumination toggles on; at the second press, it toggles off. Etcetera.
- Off after delay
- The button is illuminated at a button press, and goes off after the specified number of seconds have elapsed.
- Blink, off after delay
- The button starts to blink after a button press, and keeps blinking for the specified number of seconds (after which it goes off).
The “delay” option specifies the delay in seconds for the actions that turn off automatically after a period.
Some models of the illuminated dome buttons feature a configurable brightness. For these models, the brightness can be adjusted by moving a slider left or right. Note that the slider is only enabled for the button models that support brightness adjustment.
The Pin-Code dialog
Before first use, a Wireless Button must be connected to a Wireless Dongle. A new button broadcasts its presence to any dongle in reach (it does so after every press on the button).
When the Key Configuration utility receives a notification of a new button, it pops up the dialog that requests for its pin-code. If this newly detected button belongs to you, you can enter the pin-code and confirm the dialog. From that point on, the button is bound to the dongle. Other dongles will not see the button.
The pin-code for a Wireless Button is printed on the bottom of the button.
The Tools for a Wireless Button
Promiscuous mode
Note: Promiscuous mode is not available for the Battery-free Button and its associated Dongle. This section only applies to the original Wireless Button. The Dongle for the Battery-free Button always detects all buttons that are in range, provided that Key Configurator is running.
Once a (battery-powered) Wireless Button is configured to a Dongle, other Dongles no longer see it and the Button does not respond to any commands of a different Dongle. If you wish to reassign the Button to a different Dongle, you need to use the “Tools” button in the Key Configuration utility, and then activate “Promiscuous mode”.
The next step is to press the Button. The Key Configuration utility will now pop up the pin-code dialog, where you can enter the pin-code for the Button. If you confirm this (and if the pin-code is correct), the Button is reassigned to the new Dongle.
In promiscuous mode, the Dongle detects any Wireless Button, so including Buttons assigned to another Dongle. Promiscuous mode is limited, though, to detecting these Buttons. Without entering the pin-code, you cannot use or configure the button.
Clearing a Button from the Dongle
Note: The option to clear a single button is only available on the Battery-free Button. On the original battery-backed Wireless Button, you must instead reset the Dongle to factory defaults.
Up to six Buttons can be assigned to a Dongle. If all six slots of a Dongle are allocated, no new button can be connected to it. If a Button is no longer in use, you can free its slot. Then, a new button can be assigned to this slot.
The first step is to select the button to clear in the main window. Then click on the “Tools” button to open the Tools dialog. In this dialog, set a checkmark on the “Clear selected button” and confirm.
Resetting the Dongle
Up to six Wireless Buttons can be assigned to a Dongle. If all six slots of a Dongle are used, no new button can be connected to it. If you need to start afresh, in order to use the Dongle with a different set of Wireless Buttons, you can select to perform a full reset of the Dongle. This action will return the Dongle to its initial state.
If you wish to reassign buttons to that same Dongle again, you may need to set the Dongle to promiscuous mode. (This does not apply to the Battery-free Button.)